For agencies🏢 Agency Management
Manage your team roster
Invite interpreters by email and manage your active, pending, and placeholder relationships, plus office staff, all in one roster.
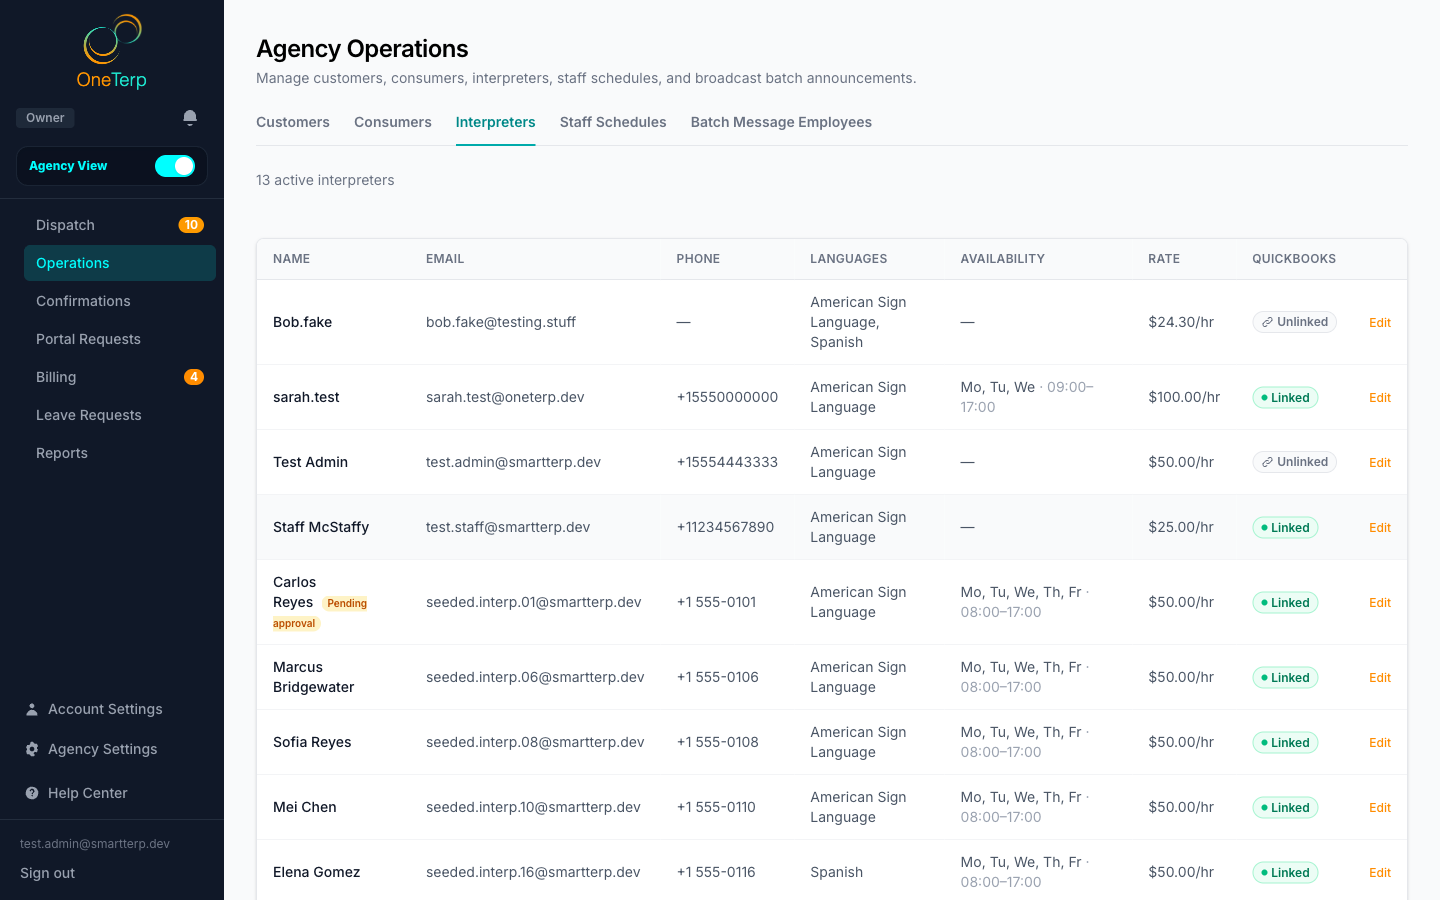
Your roster is everyone connected to your agency: interpreters and office staff. You invite interpreters by email, accept or reject pending connections, and open each person for details.
Watch the walkthrough
4:37A step-by-step walkthrough of adding a new interpreter to your agency roster. · Open in a new tab
Step by step
- 1Go to Agency, open the Operations page, and select the Team Roster tab.
- 2Click "+ Add person" to send an invitation by email; the interpreter is connected once they accept (or as a placeholder if they have no account yet).
- 3If the invitation never arrives, open their row and use "Resend invite". The row itself tells you whether an email was ever delivered.
- 4Review pending rows and click Approve or Reject on incoming join requests.
- 5Click Manage on a row to open the detail slide-over with their profile, rates, compliance documents, and (when QuickBooks is connected) vendor or employee linking.
- 6Watch for the pending-rate-proposal indicator on a row, which means the interpreter has proposed rates for you to review.
- 7The roster is grouped into Active Interpreters, Office Staff, and Placeholders; an office-staff person's slide-over has the employment settings (W-2 toggle, rate) for putting them on the time clock.
- 8To end someone's involvement, open their slide-over and use the Remove section at the bottom. Which options appear depends on who they are, see the tips below.
Screenshots
Tips
- The roster is the one place your people live. Required documents and compliance status are a section inside each person's slide-over rather than a separate tab.
- The table shows who they are, their status, and how to reach them. Full email and phone are in the slide-over rather than as columns.
- Clicking an interpreter's name on the dispatch board jumps straight to their roster entry.
- An amber "to confirm" badge next to someone's name means they have claimed one of your own tags and nobody has confirmed it yet. It counts for nothing until you do, so open them and confirm or decline.
- Ending an interpreter relationship stops them appearing on the dispatch board and reopens their unfilled future slots. Past work and pay records are kept.
- "Remove agency access" sets every permission area to No access and marks them Inactive. Grant any area again later to bring them back. It does not end a W-2 employment record, so payroll history stays intact.
- "Remove agency access (keep as interpreter)" is for dual-role people: they lose the agency console and every permission area but stay an active interpreter you can still schedule.
- "Remove from roster" clears an inactive or ended row off the list entirely. Future jobs on them reopen, past work is kept, and re-inviting brings them back.
- Rates, rate proposals, and purchased time need Billing access, and setting a wage needs Settings access or ownership. Someone with Billing but not Settings can propose and approve rates but not set a salary.
- Interpreters can work with multiple agencies; each connection is isolated to your agency.
- To add someone who has no OneTerp account yet, invite them by email and they become a placeholder you can schedule immediately.
- Mark a trainee as an intern on their roster entry to enable shadow scheduling (see the dispatch board article). The intern toggle needs Coordinate access.
- The Go-to rating slider on an interpreter's entry tells Best Fit how strongly to lean toward them, from Backup to Go-to, with neutral in the middle. It also sets their default place on the dispatch board. Anyone with Coordinate access can see it; only owners and admins can change it. Interpreters never see their rating.
- A person's name on the roster comes from their own account, so it updates when they change it.
- Hourly wages sit on a separate record behind Billing access. Someone with People access can still see who is W-2 and who is a contractor, they just do not see the amount.
- Everyone on the roster can be opened, including owners and anyone who predates employment records. If someone had no employment record, one is created the first time you set their employment details.
- A row reads "Sent 3 days ago" only when an invitation email actually went out, and "Added 3 days ago" when it did not. The button matches: "Send invite" when nothing has ever been delivered, "Resend invite" once it has.
- Adding someone tells you straight away if the email could not be sent, usually because your agency has no connected email sender. Connect one under Settings → Operations & Alerts → Email Sender, then send the invite. Nothing goes out from a generic OneTerp address on your behalf.
- Resending never overwrites the person. Their tags, rates, employment type, and history all stay as they are.
- Resending needs Coordinate access. Someone with only Settings access can add a person but will not see the send button.
Related articles
Still need help?
If this article didn't solve it, submit a ticket and the OneTerp team will follow up.
Contact support